 |
| Risco Blanco, The White Cliff, shining under the sun. |
After we had been finally released into the wild post-quarantine, we successfully attempted several quite difficult hiking routes. The temporary (we continue to hope) closure of our favourite hiking company made us go where they’d probably never taken us, for the reason of it being too risky or too hard or both.
 |
| Same thing, different angle |
Risco Blanco — Pico de Las Nieves — Cañadon del Jierro circular route is one of Gran Canaria classics, a must for every local hiker. It is not very long — various tracks show between 15 and 18 kilometres — but it accumulates more than a kilometre of ascent and, obviously, more than a kilometre of descent. Some bits of it are quite steep, so much so that you go up on all four and go down sliding on your bum. Good fun all the way, if you like this sort of thing. I do.
I already did this route last year, just before we were locked up, but my companions didn’t, so it fell on me to be a guide.
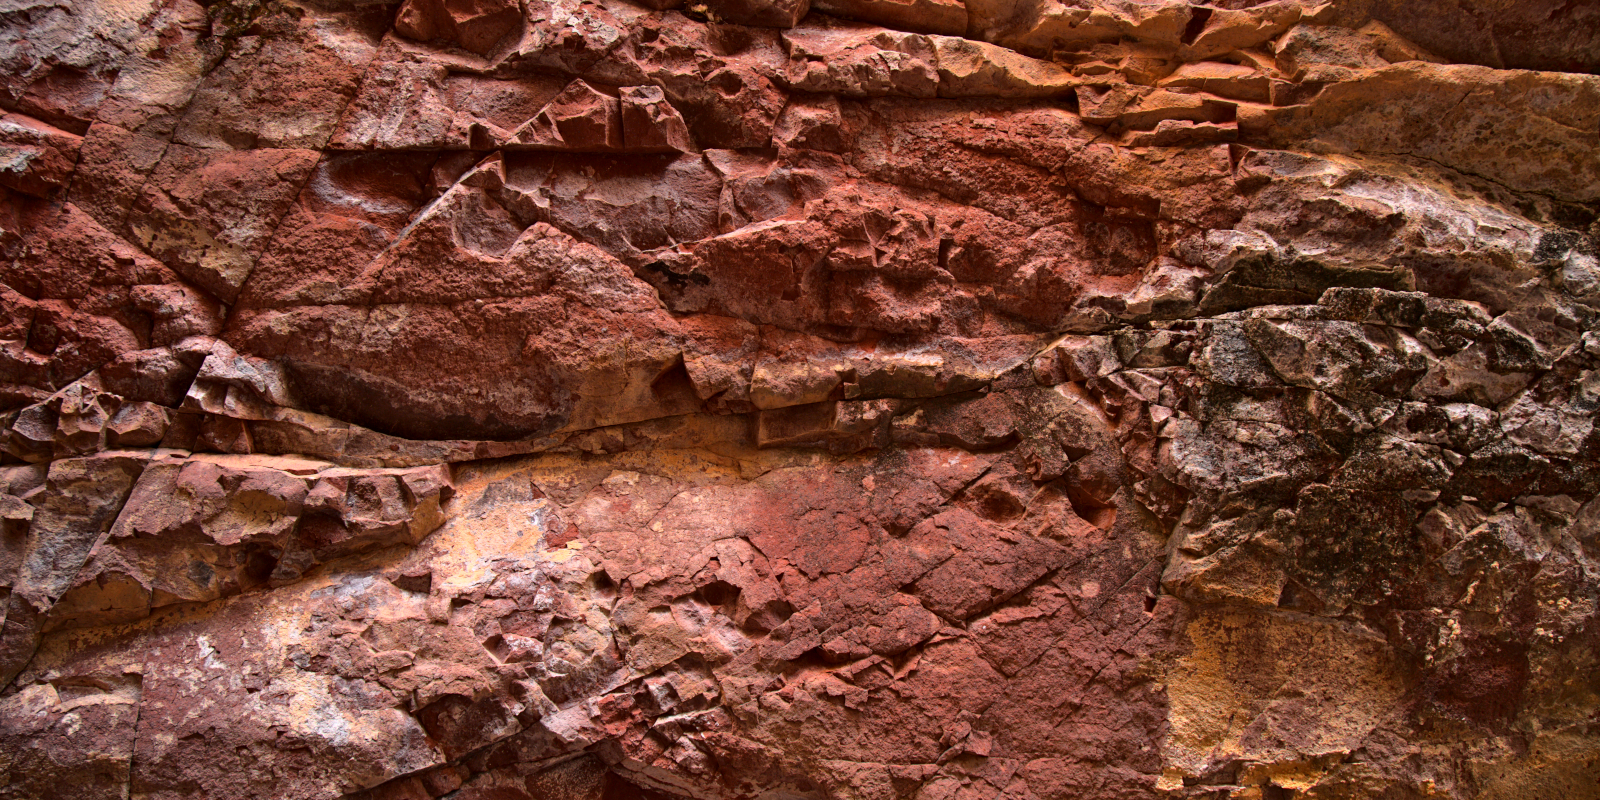
 |
| Canary Pines find a way to grow in the crevices. I assume they contribute to the gradual breaking up of the cliff. You can see some huge pieces of rock at its foot. |
A year ago, we got a bit lost and ended up improvising. Having that in mind, I spent some time trying to get the relation between the map and the steep relief. Preparation paid off and we didn’t get lost this time. Well, almost.
The route being circular, you can start your walk pretty much anywhere along it where you can find parking. No public transport option is available for this one.
 |
| Ceiling of a cave close to the beginning of the route. Don’t know why so many colours, but I find it fascinating. |
Two most logical places to start are Pico de Las Nieves, the highest point of the island, and a tiny place called La Culata, very close to Risco Blanco. We did the second option, where you do the ascent first. I advise you to do the same, because the cliff is steeper than Cañadon, and I always find it safer to climb up near-vertical than to slide down near-vertical.
There is more than one Culata on the island, you need the one in Tirajana valley, at the foot of the White Cliff. When you are already in the hamlet, start looking for parking. At the time of our last visit, there was a dirt parking where the bed of Culata ravine meets with the road GC 654. Everything might change though, so if you see a good parking spot, just park. The road between Santa Lucia de Tirajana and La Culata is not for the fainthearted. It is narrow, quite curvy on all three axes and the surface is not the best. Be warned.
 |
| More of the same. Check out the folds of rock to the upper left. Looks like a concertina |
The wikiloc route we took is here, I would like to make just a few notes about the ascent. Once the path is located between grass and bushes, it is quite easy to follow at first. Easy to follow, because there are no other options, not because it is a walk in the park, you understand. There are quite a few cairns if you feel a but unsure, too. Then, after you have walked, scrambled and crawled for about two and a half kilometres, you suddenly find yourself in a relatively flat basin, full of vegetation. That was where we got lost in 2020. Look for a side path that goes steeply up to your right. It is marked with cairns, but easy to miss between the plants. It is only a hundred meters or so from the start of the basin, so if you feel like you already walked quite a bit more, come back and start again.
Having said that, even if you don’t locate the right path, just keep in mind that your aim is to get to the highest point of the island, and there are other paths. Please don’t just strike out at random though, always look for paths and cairns. It is difficult to get lost on such a small island, but you can get yourself into a place where you manage to climb up, but can’t get down. Ever seen a cat stuck on a tree? Yes, just like that.
 |
| View over Tirajana valley, about half way into the ascent |
One more reason just occurred to me why it makes more sense to do this circular starting with the ascent at Risco Blanco. You have to take your time with this route. It took us 7 hours in total, so the second half of it is done in the afternoon. In the afternoon Risco Blanco is fully exposed to the sun and there is practically no shade. The descent of Cañadon is done mostly between pine trees, except the very last stretch, but by then you are walking in a shadow of a hill.
 |
| Risco Blanco is already half-hidden by another cliff. The edge of the basin with vegetation can be seen in the lower right corner |
Once the path is found, it is again easy to follow, in the same sense as before. You scramble up any old how, but there are cairns and sometimes, when the rock is replaced by earth, the path itself gets visible. At some points you will be going away from your half-way target, Pico de las Nieves. Not to worry, it will get clearer when you eventually complete the steep part of the ascent and find yourself in a pine forest, about four kilometres into the route. There are dirt tracks in the forest, doubling on themselves, just keep in mind you are still going up and, all in all, in the direction of Pico de las Nieves. I must say we didn’t manage to find the shortcuts (marked as “atajo”) which the route gives, but it didn’t bother us much, because the forest was full of flowers so the stroll along the track was very pleasant interlude between difficult bits.
 |
| View towards the south coast of the island before entering the forest |
Still following dirt roads, you leave the forest behind and come to a place where you can see a low eroded mountain covered in orange volcanic gravel, picon, with a few pine trees and a visible diagonal path going in the same direction as your road. Don’t know why exactly I didn’t make a few snaps there because the flowering plain in front of it was absolutely spectacular. Here is one from last year, not as nice but well, it’ll have to serve.
 |
| Here. See the mountain? See the path? |
Follow the dirt track till it joins the GC-134 just in front of Pico de La Gorra with its multiple antennas of unclear use. Well, I say unclear. Not really. If the blur googlemaps apply to the area is anything to go by, most of them must be military.
Turn left onto GC-134 and follow it. Except for two small shortcuts, you will be going by the road till you come to Pico de Las Nieves with its beautiful viewpoint and ugly military installations behind the equally ugly fence.
 |
| Views from Pico de Las Nieves are spectacular, but occasionally there are no views at all |
This time the clouds were hiding most of the landscape from us, but what we could see was just as stunning as ever.
 |
| See the white round cushions between the pines? They are Argyranthemums, marguerite daisies |
Here I come to a point where I stopped taking pics altogether, so let me give you just a few indicators. As you admire the beautiful scenery or the lack thereof, you will see a path going down in front of you. Well, they all go down from here, but you need the one which is a projection of the road you have just finished walking. The path is pretty obvious and runs steeply down till it comes to a pass where it forks into two, one that goes to Roque Nublo and another to the Llanos de la Pez. You don’t want either of them. Instead, you look left, where you see the view below.
 |
| View down into valley of Tirajana, where your car is waiting for you. |
And this is where, unless you change your mind there and then, you have to go. The “official” wooden sign doesn’t indicate the start of the path down, but many generation of hikers made the path quite obvious, plus there are cairns. So, off you go, down the first ravine, always checking for cairns. After the initial short and sharp descent, look for a path starting on your right. For a while the path will be following the folds of the cliff face, going mostly down.
 |
| View back towards Pico de Las Nieves |
Apart from the cairns, there are two markers that will indicate that you are going the right way.
First, the path will bring you to a hole in the rock, though which you will have to scramble. After that the path gets somewhat worse. I think there are a few places where there were rockfalls during the last year, after the winter rains probably. Still, there are cairns, so the path is findable.
Second, there are two planks and a metal cable. Sounds not much of a marker, but they are there for a good reason. This is the place where the horizontal temporary ceases to exist, so the planks are there to make sure you can pass these five or six meters of suspended horizontality.
Another recent rockfall obscured the path almost immediately after the planks. We did get lost at this point, trying to go down and coming, in a few dozen meters, to a sharp fall, where we were obliged to turn back. After a short search, we found the cairns once again, and what a relief it was. The path starts tuning left, then descends into a steep ravine and follows very close to the wall of the ravine on the right. Soon you find yourself looking along Tirajana valley once again, and the relative position of everything becomes clear.
 |
| Looks like my cat is peeking from the edge of the photo. You passed along the crest of the wall in front of you, right to left, on your way to Pico de Las Nieves. Clear now? |
I want to note that over the last year many unofficial paths got marked with cairns much better than I remember them. Probably hiking away from the well-trodden routes grew in popularity. We found it so along this route, and also on the walk to Ventana del Bentayga, for example.
The path forks a few times and then the branches flow back together, and there are at least two more descents where you are sliding on your bum. But the most exciting bits are already behind, now it is just trudging on to the car.
 |
| See a crocodile laying below the cliffs? |
After the last slide you find yourself on the top of a low long hill. If you are facing into the valley, La Culata and, hopefully, your car, is on your left. Walk along the crest of the hill for a bit, looking for a path going down on your left. The descent is relatively gentle, but full of the fine soil with seems to be more slippery then dry than when wet. Once at the bottom of the ravine, you have to cross it. Crossing is a bit tricky, because, once again, the recent rockfall changed the relief, filling the bed of the ravine with tractor-sizes stones. However, very considerate locals placed quite a few cairns to guide you, so you’ll be fine. Once on a cement track, take the right and you will shortly find yourself back on the GC 654 and can start looking for your vehicle.
The route we followed — here.
Many pics taken in Las Cumbres, The Summits, of Gran Canaria — here
It’s a difficult hike, but well worth it.


No comments:
Post a Comment